Sharing Documents
Share documents by email for read-only access or to collect e-signatures.
DocQ provides two ways to share documents with others:
- Through a workflow -- Documents are automatically shared with the appropriate users as they move through workflow steps. No manual action is required.
- Manual sharing -- Use the Share button to send a document directly to specific recipients via email.
This page covers manual sharing. For workflow-based sharing, see Workflows Overview.
Share by Email
To share a document manually:
- Navigate to Documents and click on the document you want to share.
- Click the Share by email button.
Access Levels
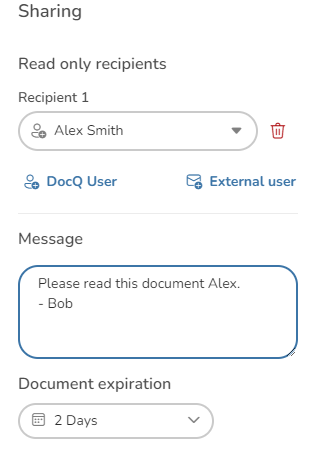
When sharing, choose the access level for each recipient:
- Read-only -- The recipient can view the document but cannot make changes or sign it.
- Sign -- The recipient can view the document and is prompted to apply their e-signature.
Expiration Time
Set an expiration time for the share link. After the expiration period, the recipient will no longer be able to access the document through the shared link.
Share Message
Include an optional message that will appear in the email notification sent to recipients.
Adding Recipients
You can add recipients in two ways:
- DocQ User -- Select an existing user from your DocQ instance.
- External User -- Enter the name and email address of someone outside your organization.
Sharing for Signatures
To share a document for e-signatures, select the Sign access level when configuring the share.
Requirements and Behavior
- The document must have Active status. Completed documents cannot be shared for signatures.
- While a share-for-signatures process is active, the document is locked and cannot be edited.
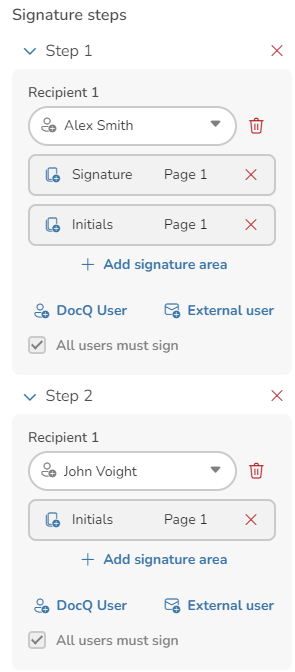
- Recipients may be assigned to different steps in the signing process. Use the Add sign step button to create sequential signing stages.
- Enable the All users must sign checkbox to require every recipient to sign before the process is considered complete.
Rejection Handling
If any recipient rejects the document during the signing process, the entire process is terminated and all previously collected signatures are discarded. The document returns to its unlocked state.
Advanced Share Settings
The advanced settings give you more control over the sharing experience.
Allow Copy Request
Enable this option to allow recipients to request a copy of the document.
Defining Signature Positions
By default, recipients can place their signature anywhere on the document. For more structured signing, you can predefine exactly where each recipient's signature elements should appear.
Use the Sign Template dropdown to select a previously saved signature template, or define positions manually for each recipient.
Adding Signature Elements
To add signature elements for a specific recipient:
- Click the +Add sign button next to the recipient's name.
- Select the element type:
- Signature -- A full e-signature
- Initials -- The signer's initials
- Date stamp -- Automatically inserts the signing date
- Click the desired position on the document preview to place the element.
Cloning Elements Across Pages
If the same signature element needs to appear on multiple pages, use the Clone to all pages feature to replicate a placed element across every page of the document.
Saving as a Signature Template
If you frequently share documents with the same signature layout, save your configuration as a reusable template:
- Define all signature positions for your recipients.
- Click the Save as new button in the Sign Template frame.
- Enter a name for the template.
The saved template will appear in the Sign Template dropdown for future shares.
Info
Signature templates can only be created from .pdf documents. For more on managing signature templates, see Signature Templates.
Next Steps
- Reviewing Documents -- Learn how recipients review and sign shared documents
- E-Signatures Overview -- Understand DocQ's e-signature capabilities
- Signature Templates -- Create and manage reusable signature layouts